Monday, March 5, 2012

St. George Parade of Homes

As I previously posted I have uploaded a handful of pictures 
from my install in St. George for the Parade of Homes.  
So here goes......


I am really fond of this shot taken directly in front of the kitchen table and looking towards the built in buffet.  This space was rather tight but I was able to pull it off and create a formal dining feel even though this space is adjacent to the kitchen.  Of course selecting a round table really helped the overall flow and movement for this area.  Side note: if you are limited on space look for a smaller round table to work for your everyday living but can also extend with additional leaves to provide more seating when you are having a get together.


Here is another shot of the kitchen table area looking into the adjoining living room.  This particular floor plan and space allocation, for this twin home, is a rather smart use of space.  Each space is large enough to feel open but also provides a cozy comfortable feel.


Kitchen nook looking into the adjoining living room.  The overall color scheme is one that is light and calm which helps to create a flow from one area to the next.


Tucked into the far corner of the living room is a comfy stylish reading chair.  This chair stands alone in the space but is a welcome addition next to one of the "grandma" cabinets that flank either side of the fireplace.  I am enamored with how simple and understated this area turned out and also how inviting it can be at the same time.


Upstairs the loft area has a hipper younger vibe.  The loft is a multi-use space with a bar area for entertaining, TV lounge area and a play area.  Adding a little spunk and energy to this space is the bold splash of tangerine orange.  It did the job!


Another angle of the lounge area in the loft.


Standing in the entry you catch a glimpse of the stairs that lead you to the loft.  
Beyond that is the kitchen living area.
Again simplicity has ruled the overall design of this project.


Special thanks to my co-collaborator Jenny Wright.  We had such a fun time working along side each other through the entire process starting last year with the material selections and continuing all the way through the finishing touches of the installation.

I hope you enjoy!

Tracee


Tuesday, February 14, 2012

St. George Parade of Homes

Well back to work I go.  I am settling into the office from an exhausting weekend install in St. George for the 2012 St. George Parade of Homes.  Pictures and all the details coming soon......

Thursday, January 26, 2012

Working with White


Winter Whites
Love the look and feeling of a white room but not sure if you have to keep the white the same value? I have good news. You can relax and create a warm atmosphere by mix and matching all variations of white and cream. Mixing it up helps avoid a sterile, cold feeling. From frosty icicles and glistening snowdrifts, winter wears a wardrobe of white that helps to inspire decor in any style.
QUICK TIP —
Look for fabrics that have:

  • Visual depth
  • Texture 
  • Yarn variation (different sizes of yarns and different yarn types)

Don't shy away from using white this season — envelope it, adore it, live with it and best of all love it! As always, if you see something you like here or it sparks your imagination, contact me and I can source pieces for you or help in creating your room.
Here are some examples of how to incorporate white —
This exquisitely appointed crystal and polished nickel chandelier from Hudson Valley Lighting is elegant.

Nubby, chunky wool carpeting to add warmth and texture under foot. This is called Jaffa, from Stark Carpet.

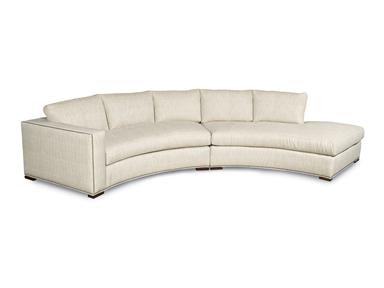
Curl up on this over-sized, comfy sectional with clean lines (find at Kravet.com). Just be careful not to spill the hot chocolate!
Pillow power from Pottery Barn — see what I mean about texture?


Add a dash of mirror and polished nickel (table from Worlds Away) to reflect all of the different textures and items for a home run!

Lacquered painted pieces (shiny) are a nice compliment to the thick, full textures of the fabrics and flooring.

Accessories are key. Decorative coral (from Furbish Studio) adds an element of whimsy and texture to the table top. 


The final touch — Add a stack of coffee table books, preferrebly with white binding accented with colored or black lettering.

Monday, January 23, 2012

All Things Owls

Give a HOOT about OWLS
My current obsession? All things OWLS! They're a symbol of foresight, wisdom and protection. Their fluid outline is immediately recognizable so a lot of detail isn't needed, making them an ideal muse for graphic and soft goods designers.

Whether it be a hint, focal point, bedding or artwork, the new modern interpretation of the owl is killer!

Here are some owl items to consider if you'd like to give a hoot too:

Kids Bedding
Love, love this color combo (right) from DwellStudio Kids. The fresh crisp colors are perfect for a little boy's room.


Artwork
Here's an exciting way to add color and whimsy to, let's say, a laundry room.
Pair this Hybrid-Home Limited Edition Print "Friend Owl," with a playful rug and you'll transform a dull work space into a quirky, fun laundry room. The story about how Hybrid-Home got started is inspiring and lends further meaning to the print. I'm all about supporting women entrepreneurs!


Peel and Stick 
Here are some peel and stick wall decals from DwellStudio that are available in 3 different sizes. 
They have an awesome customization/sizing app online that allows you to play with the sizes and arrange the owls.

Small OWL: 10.25” w x 14” h
Medium OWL: 13.25” w x 18.25” h
Large OWL: 17.25” w x 23.75” h

Owl Bedding — for grown ups!
Who? Who made this lovely handpainted duvet cover? ShaNickers from Etsy! Talk about unique and limited-edition. So many possibilities for art and accents with this duvet as the focal point.

Owl Accents
Infinite possibilities with this small b&w vase from Global Views.


Tuesday, January 17, 2012

Bathroom Solutions

Bathroom countertops: Why so short?

My rant for the day is the height of bathroom countertops, commonly 29". This makes the countertop like a table but is quite short for most adults to use the sink. The standard height for kitchen countertops is 36" or 3-feet. This is typically the optimal and most ergonomic height for most tasks in the kitchen. Why would it be any different in the bathroom?

Some manufacturers and builders are catching on and offering cabinets called "shaving" or "comfort" height countertops. Translation: kitchen-height countertops and vanities for bathrooms. 

Children's bathroom design
Consider a step stool built right into the toe kick area
A toe kick is a recess at the bottom of a base cabinet. It provides a recess for your feet (mostly your toes!) so you can get close to the counter top without losing your balance. Some people like to add more storage by building a drawer into the toe kick portion of the cabinet. For children's bathrooms, making it built-in step that you can easily slide in and out makes for a functional and attractive solution. You get your higher countertops and kids and still brush their teeth and wash their hands with ease.

Here are some great examples from www.houzz.com.


Temporary and less expensive solution
If you have young children and don't want to pay for built-ins, there are plenty of fun workarounds. Raise the cabinets to accommodate stool storage or choose a sink basin with no cabinets underneath. 


Monday, January 16, 2012

Entryway Solutions

Now you see it, now you don't!

One of my clients is obsessed with shoes. What? A client who hires an interior designer is obsessed with shoes? No way, right? However this isn't a Jimmy Choo addiction. This is all about the pile of shoes that accumulates in her entryway as her three boys and husband come in and out of the house. It wouldn't be a big deal if she had a mud room but she doesn't. Enter Tracee G Design...

Here's the solution I came up with in the form of green cubes tucked under an entryway table.

The entryway table I designed has a sleek gun-metal gray automotive finish. 
This serves to frame the cubes, which are covered in leather
with stamped crocodile detail and painted limescicle green.


I designed the cubes to have hidden storage capacity.
Simply spin them around on the low-profile casters.
Take a seat on one and put your boots away in the other.
Sorry, Sorels not included!
   

The interior of the cubes is black melamine.
I added the shelving option to increase the storage options.
Shelving can be moved up, down or removed altogether.


Polished nickel nail heads add an unexpected and unique detail.
 

Monday, January 2, 2012

Organize/Store Holiday Decorations

Just roll with it
Cardboard tubes and plastic H-frame extension cord
reels are perfect for winding up holiday lights. 
Don't get me wrong, I LOVE the holidays but I find dealing with lights totally frustrating. It seems like no matter how carefully you roll and stack them the year before, there's still untangling to be done. Getting them on the tree or wrapping them around porch polls is a whole other affair. Now it's time to pack away the jingle bells and, ugh, put away the lights.

This year I was determined to make the whole process easier and inexpensive.

Step 1:
Start with a clear storage tote with handles (you can find these at Target, Walmat, Lowes, etc.).

Step 2: 
Collect cardboard paper towel and wrapping paper tubes over the holidays. Paper towel tubes are perfect for smaller strands of lights; cut the wrapping paper tubes to fit the storage tote. You could also use H-frame extension cord reels.

Step 3: 
Make two slits on each end of the roll. Use the first slit to hold the plug in place and begin wrapping the lights around the tube, keeping the rows even and close together. When you reach the end of the string simply put it closest slit so the strand doesn't unroll.


Step 4:
Lay the lights down in stack or put them upright in the tote. You'll be amazed how many you can fit and how easy the unwinding process will be next year!